Electrifying your terminal with AI
I spend most of my day working right in the terminal—whether I’m writing code, listening to music, or jotting down notes (you’re reading one of those notes right now). My setup is pretty classic: Zsh + tmux + Neovim on Ubuntu 24.04.2 LTS, running on a Dell G15 5315 with an NVIDIA GeForce RTX 4050. You can peek at all my configuration files over on my GitHub: dotfiles.
Today, I want to explore how to weave AI assistance directly into that same terminal-centric workflow.
The first question that popped into my mind was: “Is there a ChatGPT CLI?” It turns out there are a couple of options:
- OpenAI CLI – The official command-line interface for interacting with OpenAI models.
- ChatGPT CLI (community tools) – Projects like
chatgpt-clithat let you communicate with ChatGPT from your shell.
However, both of these approaches come with a few drawbacks. They aren’t free, and they can feel sluggish at times because every request depends on network speed and server availability. You’re billed based on “tokens,” which are roughly equivalent to words exchanged during a session.
This token-based pricing model isn’t unique to OpenAI—most AI providers work this way. Below is a quick overview of some major vendors and how they charge:
1
2
3
4
5
6
7
8
9
10
11
12
13

| Provider                                     | Official CLI Tool                           | CLI Purpose / Features                        | Model Access Type          | Pricing Model                      | Notes                                               |
|---------------------------------------------|---------------------------------------------|-----------------------------------------------|----------------------------|------------------------------------|-----------------------------------------------------|
| **OpenAI**                                   | Yes — OpenAI CLI & ChatGPT CLI wrappers     | Chat, code, completions, embeddings           | Hosted API                 | Pay per 1,000 tokens               | Most widely used; CLI tools free, pay for API usage |
| **GitHub Copilot**                           | Yes — Copilot CLI (beta) and plugins        | AI coding assistant integrated into editors   | Hosted API (OpenAI-based)  | Subscription ($10/mo or $100/yr)   | Focused on coding, supports Neovim/Vim, VSCode etc. |
| **Anthropic (Claude)**                       | No official CLI yet (community tools exist) | Chat & completions via API                    | Hosted API                 | Pay per usage (tokens)             | Competes with ChatGPT, offers safe completions      |
| **Google**                                   | Yes — `gcloud ai` CLI                       | Call Vertex AI models for text & chat         | Hosted API                 | Pay per usage (tokens/characters)  | Enterprise ready, requires setup                    |
| **Amazon AWS**                               | Yes — AWS CLI (for AI services)             | Invoke Bedrock, Comprehend, and other AI      | Hosted API                 | Pay per API call (varies)          | No dedicated chatbot CLI, scripting via CLI         |
| **Cohere**                                   | Yes — Cohere CLI                            | Text generation, embeddings, classification   | Hosted API                 | Pay per usage                      | Popular in enterprise & dev circles                 |
| **AI21 Labs**                                | Yes — AI21 Studio CLI                       | Text generation and language models           | Hosted API                 | Pay per usage                      | Known for Jurassic-2 family models                  |
| **Meta (LLaMA)**                             | No official CLI; community tools exist      | Open-source LLaMA models (local or cloud-run) | Local or cloud self-hosted | Free software, hardware/cloud cost | No hosted API or official CLI yet                   |
| **Open Source LLMs** (GPT-J, GPT-NeoX, etc.) | Various community CLI tools                 | Run locally or in cloud                       | Local or cloud self-hosted | Free software, hardware cost       | No official hosted service, requires setup          |
In the next section, we’ll explore how to run a completely local AI model—no network required, and no token billing—directly in your terminal.
Since this is an experimental setup and I’m not ready to incur any costs, our focus shifts to locally hosted models like LLaMA. That said, I want to keep the door open for paid options in the future if they become compelling, without having to refactor everything. Admittedly, this might slow down the “electrification” process a bit. 😉
There are two prominent open-source local LLM APIs to consider:
For a detailed comparison, see this article:
Ollama vs. LocalAI: Open Source Local LLM APIs.
Based on adoption and ease of setup, we’ll use Ollama. Ollama requires GPU support—which works in our favor—and its lack of native OpenAI API compatibility isn’t a dealbreaker for our free, open-source goals. If you don’t have a GPU, however, LocalAI may be a better choice.
Running Ollama in Docker
To get started, we’ll spin up Ollama in a Docker container. This keeps everything isolated and makes it easy to tear down or upgrade the environment later.
- Pull the Ollama image:
1
   docker pull ollama/ollama
- Run the container in detached mode:
1
2
3
4
5
6
7
8
9
10
11
12
docker run -d \
  --name ollama \
  -p 11434:11434 \
  -v ollama-data:${HOME}/.ollama \
  --gpus all \
  ollama/ollama

  # --name ollama :  gives the container a human-friendly name.
  # -p 11434:11434 : exposes Ollama’s default API port (11434) on your host.
  # -v ollama-data:${HOME}/.ollama : mounts a local data directory so models and
  #       state persist across restarts.
  # --gpus all : passes through your GPU to Ollama (if available).
Downloading a Model
Once the container is running, pull down a language model. In this example, we’ll use Mistral, which strikes a good balance between speed and accuracy on GPU. If you need code-focused capabilities, consider CodeLLaMA or WizardCoder. For raw reasoning power, LLaMA 2 13B is an excellent choice.
1
docker exec -it ollama ollama pull mistral
This command downloads the mistral:latest model into your Ollama data directory.
Testing with a curl Request
After the model finishes downloading, verify that Ollama is up and running by sending a quick API call:
1
2
3
4
5
6
curl http://localhost:11434/api/chat -d '{
  "model": "mistral",
  "messages": [
    { "role": "user", "content": "Write a shell script that greets the user" }
  ]
}'
This is how it looks like on my setup
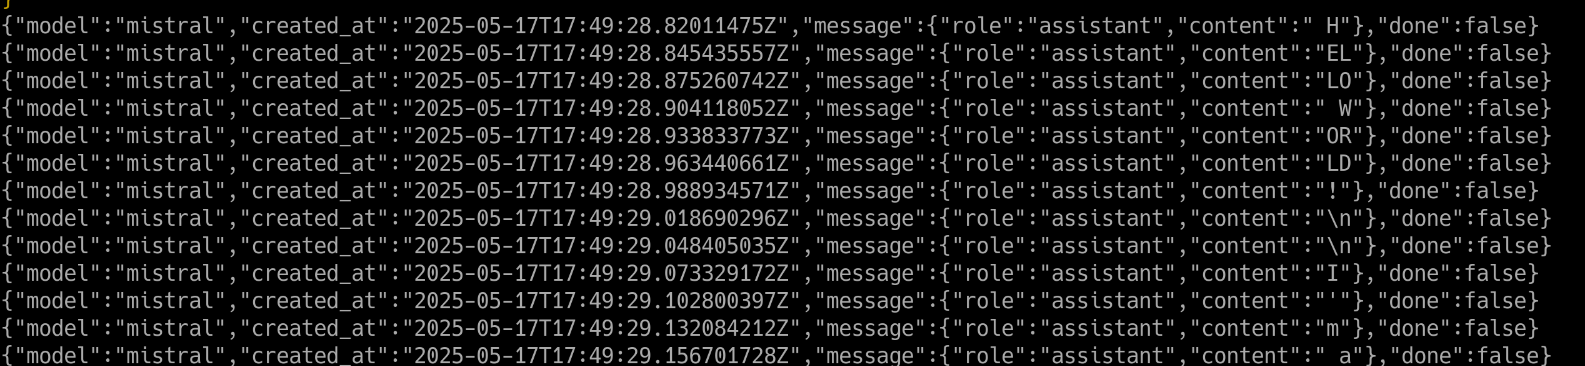
This is the json partial output from the model. Note the HELLO WORLD! message on the right of the text.
Shell
Below is a Python script that uses the requests module to emulate a simple chatbot in your terminal. It sends your input to the local Ollama API and prints the response. For a more feature-rich version—complete with history management, input prompts, and error handling—check out my dotfiles.
1
2
3
4
5
6
7
8
9
10
11
12
13
14
15
16
17
18
19
20
21
22
23
24
25
26
27
28
29
30
31
32
33
34
35
36
37
38
39
40
41
42
43
44
45
46
47
48
49
50
51
52
53
import requests
import json

def stream_ollama_response(prompt, model="mistral"):
    print(f"Assistant: ", end="", flush=True)

    try:
        with requests.post(
            "http://localhost:11434/api/generate",
            json={"model": model, "prompt": prompt,
                  "stream": True},
            stream=True,
        ) as response:
            for line in response.iter_lines(decode_unicode=True):
                if not line:
                    continue

                try:
                    data = json.loads(line)

                    content = ""
                    if "message" in data:
                        content = data["message"].get("content",
                                                      "")
                    elif "response" in data:
                        content = data.get("response", "")

                    if content:
                        print(f"{content}", end="", flush=True)

                    if data.get("done", False):
                        break

                except json.JSONDecodeError:
                    print(f"\n[Error decoding JSON line]")

    except requests.RequestException as e:
        print(f"\n[Request error] {e}")

    print()
    print(f"{'-'*65}")

def chat_loop():
    print(f"💬 Chat with Ollama ")
    while True:
        prompt = input(f"You: ")
        if prompt.strip().lower() in {"exit", "quit"}:
            break
        stream_ollama_response(prompt)

if __name__ == "__main__":
    chat_loop()
It puts out a response like
1
2
3
4
5
6
7
8
9
10
11
12
13
14
15
16
🧑 You: Hello
🤖 Assistant:
Hello! How can I help you today? Is there a specific question or
topic you'd like to discuss? I'm here to provide information, answer
questions, or just chat if that's what you prefer. Let me know and we   can get started!

🧑 You: What can you do for me
🤖 Assistant:
As a text-based AI model, I am designed to help answer questions,
provide information, generate text, and assist with a variety of tasks. Here are some examples of what I can do:

1. Answering questions on a wide range of topics, from science and
history to literature and culture.
2. Helping you write by generating text, such as emails, letters, or
even stories.
......
tmux Integration
One of the most natural places to integrate AI is right in your shell. Why would you want this? AI can translate plain-English requests (or prompts in other languages) into shell commands. For instance, if you know you need a particular utility but can’t remember which package provides it, you can simply ask the AI to install that command. Or you might ask for a script that monitors CPU usage.
A popular project for adding AI features to the shell within tmux is tmuxai. Below are the steps to get started:
- Install tmuxai
1
2
# install tmux if not already installed
curl -fsSL https://get.tmuxai.dev | bash
tmuxai can work with several AI APIs—such as OpenAI, OpenRouter, or a local Ollama instance. To configure tmuxai to use Ollama, edit your ~/.config/tmuxai/config.yaml and add the following lines:
1
2
3
4
openrouter:
 api_key: dummy
 model: mistral
 base_url: http://localhost:11434/v1
This is how it looks like
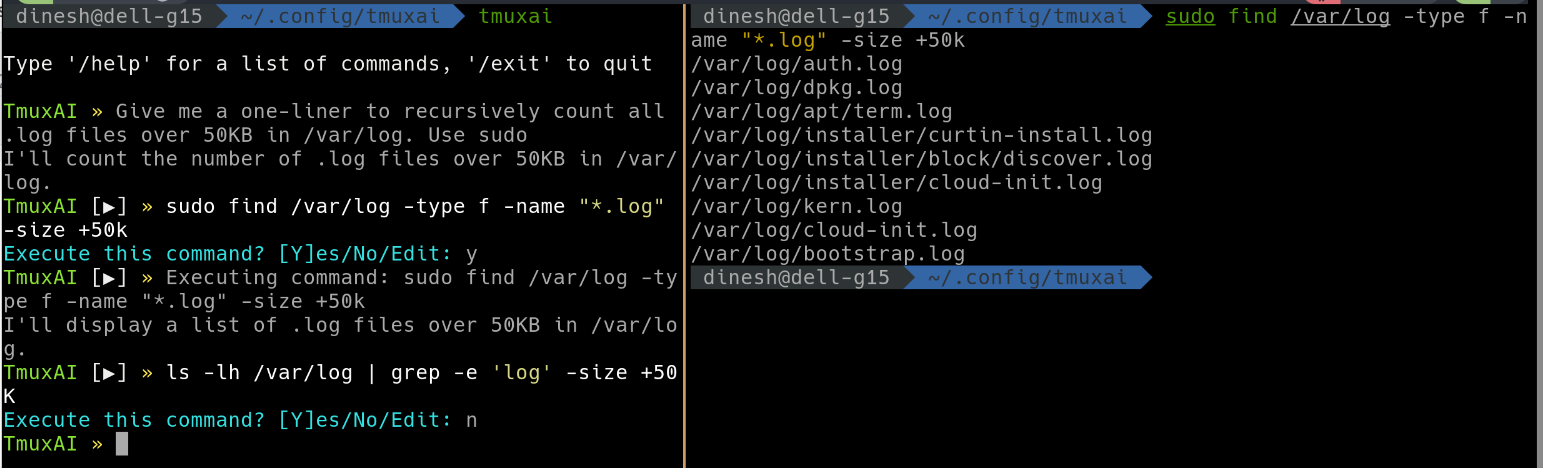
I must admit, the experience wasn’t as smooth as I had hoped. When prompted with various tasks, the responses were often unhelpful—and occasionally, the suggested commands were incorrect. I attempted to switch the underlying model to codellama:instruct, which is specifically designed to handle code-related queries, including shell scripts and Vim configurations. Unfortunately, this model also struggled to provide meaningful assistance for my use cases.
Neovim
There are multiple ways to integrate AI into Neovim. Some plugins are tailored for specific providers—for example, "jackMort/ChatGPT.nvim" for OpenAI, or "CopilotC-Nvim/CopilotChat.nvim" for GitHub Copilot. However, in line with our goal of using a local setup via Ollama, we’ll be using gp.nvim.
This plugin is quite versatile and widely adopted. It offers features such as ChatGPT-like conversational sessions, instructable text/code manipulation, and even support for speech-to-text and image generation.
Below is the configuration snippet for Lazy:
1
2
3
4
5
6
7
8
9
10
11
12
13
14
15
16
17
18
19
20
21
22
23
24
25
26
27
28
29
30
31
32
33
34
35
36
37
38
39
40
41
42
43
44
45
46
47
48
49
50
51
52
53
54
55
56
57
58
59
60
61
62
63
64
65
66
67
68
69
70
71
72
73
74
75
  {
    "robitx/gp.nvim",
    event = "VeryLazy",
    dependencies = { "nvim-lua/plenary.nvim" },
    config = function()
      require("gp").setup {
        -- 1) Disable OpenAI (since you want to use Ollama locally)
        providers = {
          openai = { disable = true },

          -- 2) Enable Ollama provider pointing at localhost:11434
          ollama = {
            disable = false,
            endpoint = "http://localhost:11434/v1/chat/completions",
          },
        },

        -- 3) Modify ChatOllamaLlama3.1-8B from default config to use llama3.2.
        agents = {
          {
            name = "ChatOllamaLlama3.1-8B",
            disable = true,
          },
          {
            provider = "ollama",
            name = "ChatOllamaLlama3.1-8B",
            chat = true,
            command = false,
            -- string with model name or table with model name and parameters
            model = {
              model = "llama3.2",
              temperature = 0.6,
              top_p = 1,
              min_p = 0.05,
            },
            -- system prompt (use this to specify the persona/role of the AI)
            system_prompt = "You are a general AI assistant.",
          },
          {
            provider = "ollama",
            name = "CodeOllamaLlama3.1-8B",
            chat = false,
            command = true,
            -- string with model name or table with model name and parameters
            model = {
              model = "llama3.2",
              temperature = 0.4,
              top_p = 1,
              min_p = 0.05,
            },
            -- system prompt (use this to specify the persona/role of the AI)
            system_prompt = require("gp.defaults").code_system_prompt,
          },
        },
      }

      local function keymapOptions(desc)
        return {
          noremap = true,
          silent = true,
          nowait = true,
          desc = "GPT prompt " .. desc,
        }
      end
      -- Optional: keymaps to invoke chat or code assistance
      vim.keymap.set("v", "<C-g>p", ":<C-u>'<,'>GpChatPaste<cr>", keymapOptions "Visual Chat Paste")
      vim.keymap.set("v", "<C-g><C-v>", ":<C-u>'<,'>GpChatNew vsplit<cr>", keymapOptions "Visual Chat New vsplit")
      vim.keymap.set({ "n", "i" }, "<C-g><C-v>", "<cmd>GpChatNew vsplit<cr>", keymapOptions "New Chat vsplit")

      -- Prompt commands
      vim.keymap.set({ "n", "i" }, "<C-g>r", "<cmd>GpRewrite<cr>", keymapOptions "Inline Rewrite")
      vim.keymap.set("v", "<C-g>r", ":<C-u>'<,'>GpRewrite<cr>", keymapOptions "Visual Rewrite")
    end,
  },
The key factor to note is we are disabling the default configurations to use our model llama3.2. The result is amazing. Here is one workflow
Conclusion
Integrating AI into tools like the Zsh prompt and Neovim can significantly enhance productivity. While OpenAI models currently lead in response quality—be it for chat or code generation—open-source alternatives like LLaMA 3.2 and Mistral offer impressive performance, especially considering they are freely available.